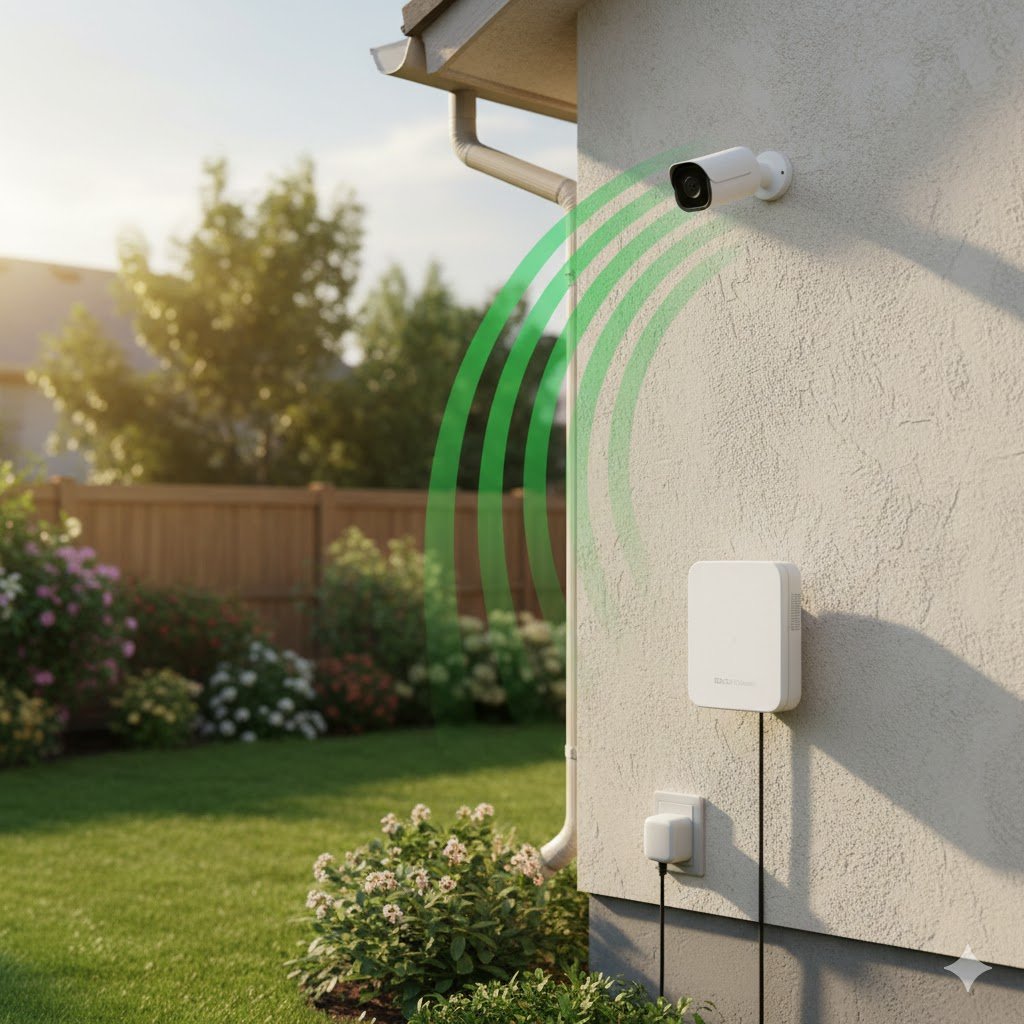
You’ve just bought a top-tier 4K security camera. You unbox it, pair it inside near your router, and the image is crystal clear. Excited, you grab your drill, mount it above the garage door, and… nothing.
Or worse: it works for ten minutes, then goes offline. Maybe you get a grainy, pixelated mess that looks more like a 1990s webcam than a modern security device.
Before you return the camera or blame the manufacturer, stop. The problem likely isn’t the camera—it’s the physics of your home. Specifically, the invisible “pipe” trying to carry that 4K video through solid brick and stucco.
Here is why your outdoor camera is struggling and, more importantly, how to fix it using tools you already have.
Transparency Note: This article contains affiliate links. As an Amazon Associate, I earn from qualifying purchases at no extra cost to you. This helps support the blog.
The Invisible Problem: RSSI vs. Resolution
To understand why your camera fails, you need to understand two concepts: Bandwidth and Signal Strength (RSSI).
Think of your Wi-Fi as a water pipe.
- Bandwidth is the width of the pipe.
- Video Resolution is the amount of water trying to rush through it.
A 4K security camera requires a massive amount of constant data upload—often between 4 Mbps and 8 Mbps of sustained upload speed. If your Wi-Fi signal is weak at the installation spot, the “pipe” narrows drastically.
When the pipe gets too narrow for the water (video) to pass through, the camera has two choices:
- Drop the quality: It lowers the bitrate, resulting in blocky, pixelated footage.
- Choke (Buffer): The video freezes or the camera disconnects entirely to try and reconnect.
Ideally, we always recommend wired connections for stability. But if running Ethernet cables isn’t an option for you, you must ensure your wireless “pipe” is wide enough. Check this article to understand about cables differences: Do you need Cat8 for Gaming?
The “Wall of Death” for Wi-Fi
Why is the signal so weak outside? It’s not just distance; it’s density.
Wi-Fi signals (especially 5GHz, but also 2.4GHz) hate physical barriers.
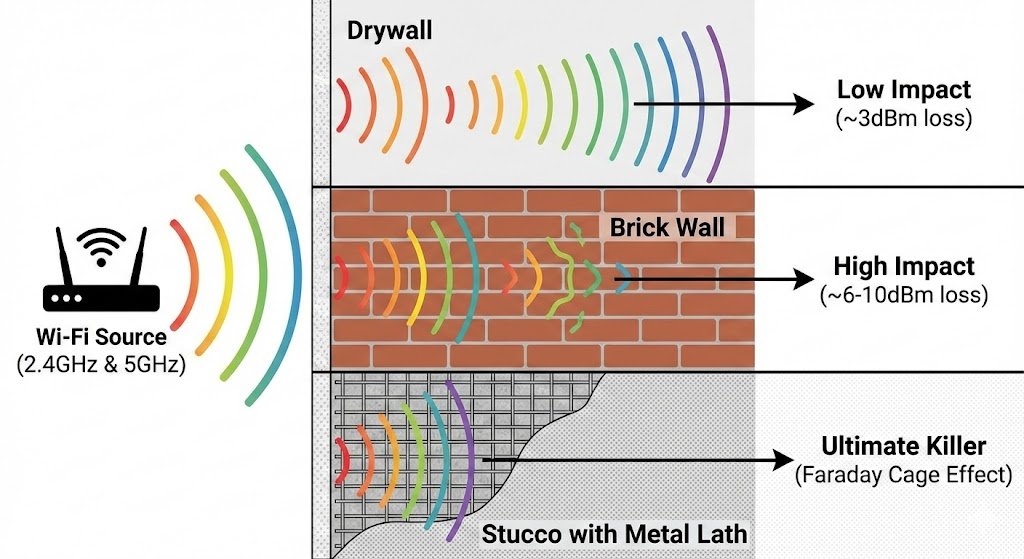
Drywall: Low impact (loses ~3dBm).
Brick (Foundations and Basements): High impact (loses ~6-10dBm).
Stucco (with metal lath – Found on exterior walls): The ultimate Wi-Fi killer. The metal mesh inside stucco acts like a Faraday cage, blocking radio waves almost completely.
Your smartphone might still work in the driveway because it buffers data (loading a YouTube video ahead of time). A security camera cannot buffer; it must stream live, second-by-second. That is why your phone works, but the camera fails.
The Solution: Test Before You Drill
Before you drill a single hole, you need to measure the signal exactly where you plan to mount the camera. Do not trust the “Wi-Fi bars” icon on your phone—it is not accurate enough.
Step 1: The “Wi-Fi Analyzer” Test
Download a free Wi-Fi Analyzer app on your phone (like “WiFi Analyzer” for Android or use the Airport Utility scanner on iOS). Look for a number called RSSI (Received Signal Strength Indicator).
- -30 to -50 dBm: Excellent. (You are practically hugging the router).
- -50 to -60 dBm: Great. Ideal for 4K cameras.
- -60 to -65 dBm: Good. Reliable for 1080p, passable for 4K.
- -70 dBm or lower: The Danger Zone. You will experience lag, dropouts, and failed recordings.
The Golden Rule: If you see -70 dBm or worse at your installation spot, do not install the camera there without fixing the network first.
How to Fix the Signal (3 Levels)
If your RSSI is too low, you have three options, ranging from free to professional.
Level 1: The 2.4GHz Switch (Free)
Most modern routers broadcast both 2.4GHz and 5GHz frequencies.
- 5GHz: Fast, but can’t penetrate walls.
- 2.4GHz: Slower, but travels much further and punches through solid objects better.
The Fix: Go into your camera’s settings (or your router app) and force the outdoor camera to connect to the 2.4GHz network. You trade a bit of maximum speed for significantly better stability.
Level 2: The Mesh Point (Moderate Budget)
If you are still using a single router provided by your ISP, it likely doesn’t have the range to reach the driveway. A Mesh Wi-Fi System replaces that single router with multiple “nodes” that blanket your home in signal.
The Fix: Place a satellite node indoors, as close to the external wall or window as possible. This allows the satellite to grab a strong signal from the main unit and “throw” it through the window to your camera.
Best for Amazon Users: The Amazon eero 6+ system is incredibly easy to set up and integrates perfectly if you use Alexa for your smart home. (I personally use this one)

Best Performance (Speed/Range): If you want future-proof speed, go with the TP-Link Deco XE75 (Wi-Fi 6E). It uses the newer 6GHz band to communicate between nodes, meaning your outdoor camera traffic won’t slow down your Netflix streaming inside.
(Not sure if you need a Mesh system or just an extender? See our detailed breakdown: Mesh WiFi vs. Range Extenders
Level 3: The Outdoor Access Point (Pro Solution)
If you have a large property, a detached garage, or thick stucco walls, indoor Wi-Fi simply won’t cut it. You need hardware that lives outside with the camera.
The Fix: Install an Outdoor Access Point (AP). These are weather-resistant units that mount on your exterior wall. You run a single Ethernet cable to them (or use a Powerline adapter), and they create a dedicated “bubble” of strong Wi-Fi outside.

Top Pick: The TP-Link EAP225-Outdoor is the gold standard for DIYers. It’s affordable, weatherproof (IP65), and broadcasts a massive signal range for your cameras and backyard browsing
Pro Alternative: If you are already in the Unifi ecosystem, the U7 Outdoor is powerful and has external antennas for better performance.
(Check this article to understand how to design the system: Designing an Unifi System)
Summary
A security camera is only as good as the connection backing it up. Don’t blame the lens for a blurry image—blame the brick wall blocking the signal.
- Download a Wi-Fi Analyzer app. [android]; [apple]
- Measure the RSSI at the spot (aim for better than -65 dBm).
- Boost your network before you mount the hardware.
Taking five minutes to measure your signal now will save you hours of troubleshooting later.